Setting up Free Custom Domain on Microsoft Azure Web App Service
In this blog, we will see how we can get a free domain, create a web app on Microsoft Azure and configure a custom domain on it.We will look into following things:
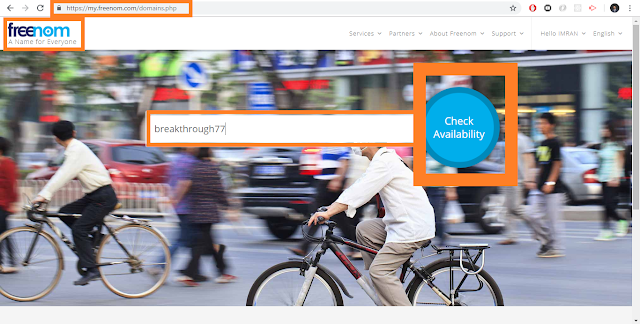
Goto Freenom and search for the domain name (here I have searched breakthrough77).

Search results show availability of name in different domain types. As we can see (as of now) there are five domains available for free. Click on Get it now.


- Registering a free domain with Freenom
- Creating a Web App in Microsoft Azure
- Configuring a custom domain on Microsoft Azure Web Apps
- Registering CName and A records on Domain Host-name provider (Freenom)
- Create and deploy ASP.NET web application on Microsoft Azure Web App through Publish Profile
Register Free Domain (.tk)
Getting a free domain is not a myth, you can easily obtain a free domain from Freenom. It provides domains of .tk, .ml, .ga, .cf and .gq host names. The procedure is as follow:
Goto Freenom and search for the domain name (here I have searched breakthrough77).

Search results show availability of name in different domain types. As we can see (as of now) there are five domains available for free. Click on Get it now.

After selecting domain, click on Checkout.

We can see that this domain is free up to 1 year and then standard charges start to apply. Click Continue.

Next fill out the details form.

Read and agree to the terms then click Complete Order.

Order confirmation message appear and an email will be sent by Freenom to providing link to its dashboard.

Now if you view My Domain in your account you will see your registered free domain appears here. Click on Manage Domain.

Here you can see basic information associated to the domain.

Creating a Web App in Microsoft Azure
Now login to Microsoft Azure Portal. Click All services, search Web App, click on Web App from search results, a new blade story appears - click Create.

In the next blade enter web app name which should be globally unique (here its breakthrough77), select subscription, select or create a Resource Group. Select a host OS to be Windows. Select Publish mechanism to be Code. Then select existing or new service plan. Here I am creating a new service plan named breakthrough77sp with Standard S1 pricing tear that support custom domain and region nearest to my location Southeast Asia. Click Ok and then click Create to create new web app.

Once web app resource is created, you can follow the link to open default web app page.

Now go to the web app resource and from option select Custom Domain. Click on Add hostname. A new blade appears on right side choose hostname you registered in previous section at Freenom. I registered breakthrough77.tk so I have entered that here. With A record selection selected in Hostname record type, click Validate. The validation result appear showing Hostname is available.

However Domain Ownership could not be validated.

As the docs suggest, we need to configure two records in DNS settings of Domain Registrar. Now go back to freenom My Domains section click on your registered domain. From there click on Management Tools and then on Register glue records.

In thee DNS Record Management section add TXT and A records with appropriate target as mention on Custom Domain of web app. Click Save Changes.

Once registry entries have been added. Go to web app's custom domain section and click on Validate again. This time it will show validation succeed for both Hostname availability and Domain ownership. Note if it fail, try again after few minutes and registry keys might have take some time before domain ownership could be validated.

Then click on Add hostname.

Now host name assigned to site appear on Custom Domain section. Next we will add another hostname for world wide web (www) traffic through CName. Click on Add hostname. Type hostname with www. address prefix ( here its www.breakthrough77.tk) and click Validate while CName option is selected in Hostname record type.

Again it validates Hostname availability but Domain Ownership could not be verified. As you might have guessed we also need to add its CName entries in Domain Registeration portal.

Goto DNS Management settings in Freenom and add CName entry with appropriate value as mentioned in Web App's Custom Domain section and click Save Changes.

Wait for a few minutes and in Custom Domain section of Azure Web App Validate www address again. Everything should be fine.

Finally, you should see two domain records one with www dot prefix and one without it.

After waiting a few minute, try and browse your domain name and you should see same default web front page which means domains are mapped correctly. Now lets quickly create and deploy ASP.NET web app to see things in actions.
Create and deploy ASP.NET web application on Microsoft Azure Web App through Publish Profile
First open Visual Studio 2017, go to File > New > Project then select Visual C# > ASP.NET Web Application (.NET Framework). Choose a name for the project (here its BreakThrough77) and click OK.

Then select MVC and click OK.

Let make a minor customization and then deploy it to Azure. Go to Project's View > Home > Index.cshtml and then make some changes.

We will make some changes to Shared > _layout.cshtml

Right-Cick Projcect and Click Publish.

Then click on Import Profile.

Go to Azure Portal and on Web App's overview page click on Get publish profile to download publish profile.

Import downloaded profile and click Publish to publish the web app to Azure.

It will take some time to publish the project to Azure and at the end open up link to Azure Websites. Now if you go to the domain name you configured in previous section, you will see your app running on your custom free domain.

Also on the world wide web host (www).

That's it today :-)


Great blog. Keep it up.
ReplyDeleteGreat job for publishing such a nice article. Your article isn’t only useful but it is additionally really informative. Thank you because you have been willing to share information with us. Simply2cloud provides the Best Microsoft Azure Training in Delhi at an affordable price.
ReplyDeleteI have bookmarked your website because this site contains valuable information in it. I am really happy with articles quality and presentation about microsoft azure. Thanks a lot for keeping great stuff. oracle scm training
ReplyDeletehi
ReplyDeleteA well-written article, good way of content delivery.
ReplyDeletestrategies of crm
artificial intelligence importance
need of cloud computing
why python
oracle interview questions
data science interview questions and answers
Heyy!!! awesome post and Nice Journey. I got so involved in this material that I couldn’t stop reading. policy procedure management software
ReplyDeleteAivivu chuyên vé máy bay, tham khảo
ReplyDeletemua ve may bay di my
giá vé từ mỹ về việt nam
từ canada về việt nam quá cảnh ở đâu
đã có chuyến bay từ nhật về việt nam chưa
Có chuyến bay từ Hàn Quốc về Việt Nam không
Vé máy bay từ Đài Loan về Việt Nam
khách sạn cách ly tphcm
chuyến bay chuyên gia
Thanks for the blog loaded with so many information. Stopping by your blog helped me to get what I was looking for. .br domain registration
ReplyDeleteThis comment has been removed by the author.
ReplyDeleteA web hosting service from Apachis is a type of Internet hosting service that hosts websites for clients, i.e. it offers the facilities required for them to create and maintain a site and makes it accessible on the World Wide Web.
ReplyDelete"nice article keep postingWeb Hosting Pakistan
ReplyDelete"
I found some useful information from this article, thanks for sharing the useful information. Explore Ziyyara Edutech’s best online tutoring sites for Class 11, offering private tuition classes designed to help you excel in chemistry and other subjects.
ReplyDeleteFor more info Contact us: +91-9654271931, +971-505593798 or visit Private tuition classes for class 11
This guide clearly explains how to connect a free domain to Azure, and I found it as structured as the best academic writing help resources. Practical, simple, and easy for beginners.
ReplyDelete